Migrating from a self-hosted setup to Kentico's cloud-native SaaS can unlock real benefits:
- 📈 Easier scalability
- 🛠️ Reduced infrastructure maintenance
- 💰 Predictable pricing
Since Kentico leverages Microsoft Azure, you also benefit from a highly sustainable platform designed for long term growth and minimal environment impact. 🌱
In this guide, I'll walk you through the step-by-step process of migrating a self-hosted Xperience by Kentico website to Kentico SaaS. This isn't a full production move, it is a trial migration to test and validate the process with minimal risk.
The Starting Point
My site currently lives on a Rackspace shared server with other internal IDHL projects, while the database is already hosted in Microsoft Azure. This hybrid setup works fine for my blog, but I wanted to explore what it's like to migrate to be fully in the cloud using their SaaS infrastructure.
The goal of this migration is not to permanently move my website, this is more of a prove it works test. Kentico has kindly provided a Level 1 SaaS instance which has two environments, a non-production (QA) and production (PROD) environment. Kentico supports many regions around the world, but I picked UK South. 🌍
Before The Move
Before any SaaS migration, I recommend backing up both the existing database and assets (content hub items and media library). Restoring these locally means you're working with the very latest versions, and ultimately these will be deployed to the SaaS environment.
At this point, I also run the CI store command to ensure the CI file were up-to-date with the latest database before making any changes:
dotnet run --no-build --kxp-ci-storeCode Changes
With the solution up-to-date and tested, it's time to adapt the solution for a SaaS environment.
Kentico provides a cloud enabled template which is great when you know you're hosting in SaaS from the start, you can install Kentico with the --cloud parameter when initially creating the project. The template includes SaaS specific files, configurations, and NuGet packages. It's all included, ready to go! 🎉
If you're migrating to SaaS, then Kentico does not provide a specific tool or guide, but you can still make use of the cloud enabled template. It really is quite simple! Use the template to create an empty project in a new folder, and merge the changes in. 🧠
Let's start by creating the empty project:
dotnet new kentico-xperience-mvc --cloud -n TestSaaSThe first important step is to review the generated .csproj file, and check for any NuGet packages that might be missing from your project. In my case, I noticed that I needed to add the following:
    <PackageReference Include="kentico.xperience.azurestorage" Version="30.3.0" />
    <PackageReference Include="kentico.xperience.cloud" Version="30.3.0" />
Next, I came across the StorageInitializationModule.cs file which contains sample code for initialising Azure Blob Storage. I made sure to include this in my project!
The SaaS template also includes a default Continuous Deployment configuration file called repository.config located in the $CDRepository folder.
The default configuration lists many object types, I was concerned it might not cover everything from my existing database. To be safe, I cleared the IncludedObjectTypes section entirely. This tells the system to include all support object types, which is exactly what I wanted for the initial deployment to SaaS. The resulting file looked much leaner:
<?xml version="1.0" encoding="utf-8"?>
<RepositoryConfiguration xmlns:xsd="http://www.w3.org/2001/XMLSchema" xmlns:xsi="http://www.w3.org/2001/XMLSchema-instance">

	<!-- Specifies which types of object operations are performed in the target database when restoring the repository:
     Create - only creates new objects. Never deletes or modifies existing objects.
     CreateUpdate - creates new objects and updates existing objects. Never deletes objects.
       Full - creates new objects, updates existing objects, deletes objects that do not exist in the repository.
     -->
	<RestoreMode>CreateUpdate</RestoreMode>

	<!-- After changing the included or excluded object types, you need to run serialization for all objects to bring
       the repository folder into the required state. Use the CLI and execute the store command for Continuous Integration or Deployment.
     Always synchronize the repository.config along with the other content of the repository folder. -->

	<!-- To learn which object types can be used in the IncludedObjectTypes and ExcludedObjectTypes definitions,
       visit the documentation: https://devnet.kentico.com/CMSPages/DocLinkMapper.ashx?version=xp&link=ci_object_types -->

	<!-- If one or more main object types are specified, only objects of the given type and their child types are processed.
       All supported object types are included if empty. -->
	<IncludedObjectTypes>
	</IncludedObjectTypes>

	<!-- Excluded object types filter the set of included object types. The specified object types are excluded from processing.
     May include both main and child object types. -->
	<ExcludedObjectTypes>
	</ExcludedObjectTypes>

	<!-- You can exclude objects from processing by adding included or excluded code names for any object type.
       Use the % wildcard at the start or end of the values to include or exclude multiple objects based on code name prefixes or suffixes.
       You can add multiple code name values separated by semicolons for each object type. -->
	<ObjectFilters>
		<!-- Ensures serialization for reusable field schemas. -->
		<IncludedCodeNames ObjectType="cms.class">cms.contentitemcommondata</IncludedCodeNames>
		<!-- If one or more code names are included, only objects matching the specified code names are included. Other objects are not processed.
         All objects are included if empty. -->
		<!-- <IncludedCodeNames>IncludedCodeNameA;IncludedCodeNameB</IncludedCodeNames> -->
		<!-- <IncludedCodeNames ObjectType="ObjectTypeB">IncludedCodeNamePrefix%;%IncludedCodeNameSuffix</IncludedCodeNames> -->

		<!-- Excludes license key settings -->
		<ExcludedCodeNames ObjectType="cms.settingskey">CMSInstanceFriendlyName;CMSInstanceID</ExcludedCodeNames>

		<!-- Excluded code names add further filtering for the set of included objects. Objects that match the specified code names are excluded from processing. -->
	</ObjectFilters>

</RepositoryConfiguration>
The next key file is Program.cs, where we need to ensure all the necessary services and middleware are registered to support Kentico SaaS.
Here's a quick overview of the changes I added:
var builder = WebApplication.CreateBuilder(args);

builder.Services.AddXperienceCloudApplicationInsights(builder.Configuration);

if (builder.Environment.IsQa() || builder.Environment.IsUat() || builder.Environment.IsProduction() || builder.Environment.IsEnvironment(CloudEnvironments.Custom))
{
    builder.Services.AddKenticoCloud(builder.Configuration);
    builder.Services.AddXperienceCloudSendGrid(builder.Configuration);
    builder.Services.AddXperienceCloudDataProtection(builder.Configuration);
}

...

var app = builder.Build();

...

if (builder.Environment.IsQa() || builder.Environment.IsUat() || builder.Environment.IsProduction() || builder.Environment.IsEnvironment(CloudEnvironments.Custom))
{
    app.UseKenticoCloud();
}
The next file I updated was appsettings.json. This was a simple change, just replacing the existing CMSHashStringSalt with the value provided in the Xperience Portal.
⚠️ But remember...when changing the salt, you need to re-sign the macros to ensure the site functions correctly afterwards.
You can do this by running the following command:
dotnet run --no-build -- --kxp-resign-macros --old-salt "Old_Salt" --new-salt "New_Salt"The final important file is Export-DeploymentPackage.ps1. This PowerShell scripts handles the heavy lifting of packaging your solution for deployment to the SaaS environment. It bundles everything together for you, all that's left if to upload the package. 👏
Before you go running the script, you need to ensure you've used Continuous Deployment store dotnet command to serialise database objects to the file system.
dotnet run --no-build -- --kxp-cd-store
    --repository-path "C:\Projects\Goldfinch.me\src\Goldfinch.Web\`$CDRepository"
    --config-path "C:\Projects\Goldfinch.me\src\Goldfinch.Web\App_Data\CDRepository\repository.config"
Now running Export-DeploymentPackage.ps1 will create a deployment package zip.
The Xperience Portal
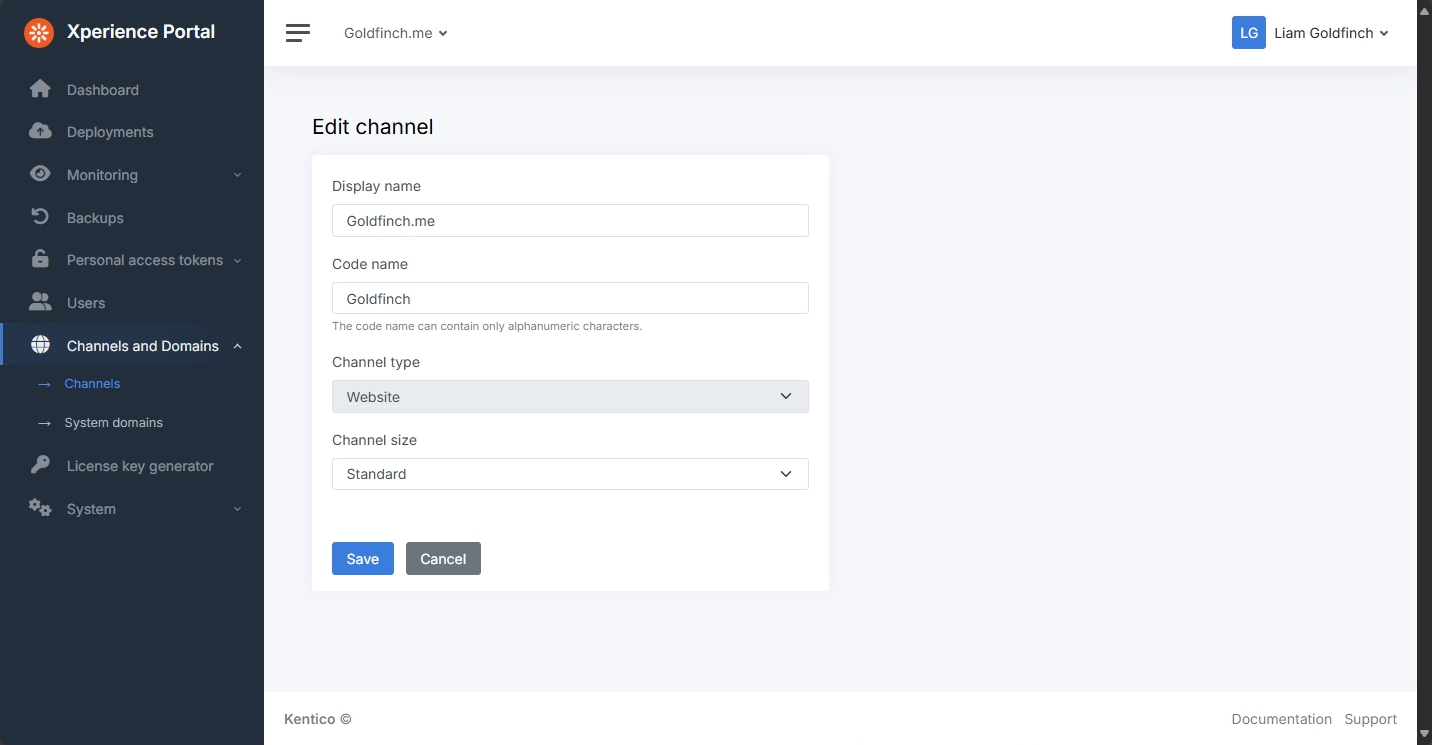
One of the key differences between self-hosted and SaaS is how you manage channels, in the SaaS world you need to do this in the Xperience Portal.
So let's go to the Channels and Domains section, and configure the channel for my blog:
The Deployment
Next, head over to the Deployments dashboard in the Xperience Portal. You'll see a QA environment which includes a button to upload your deployment package.
This lets you upload the package generated by the PowerShell script directly into the SaaS environment.
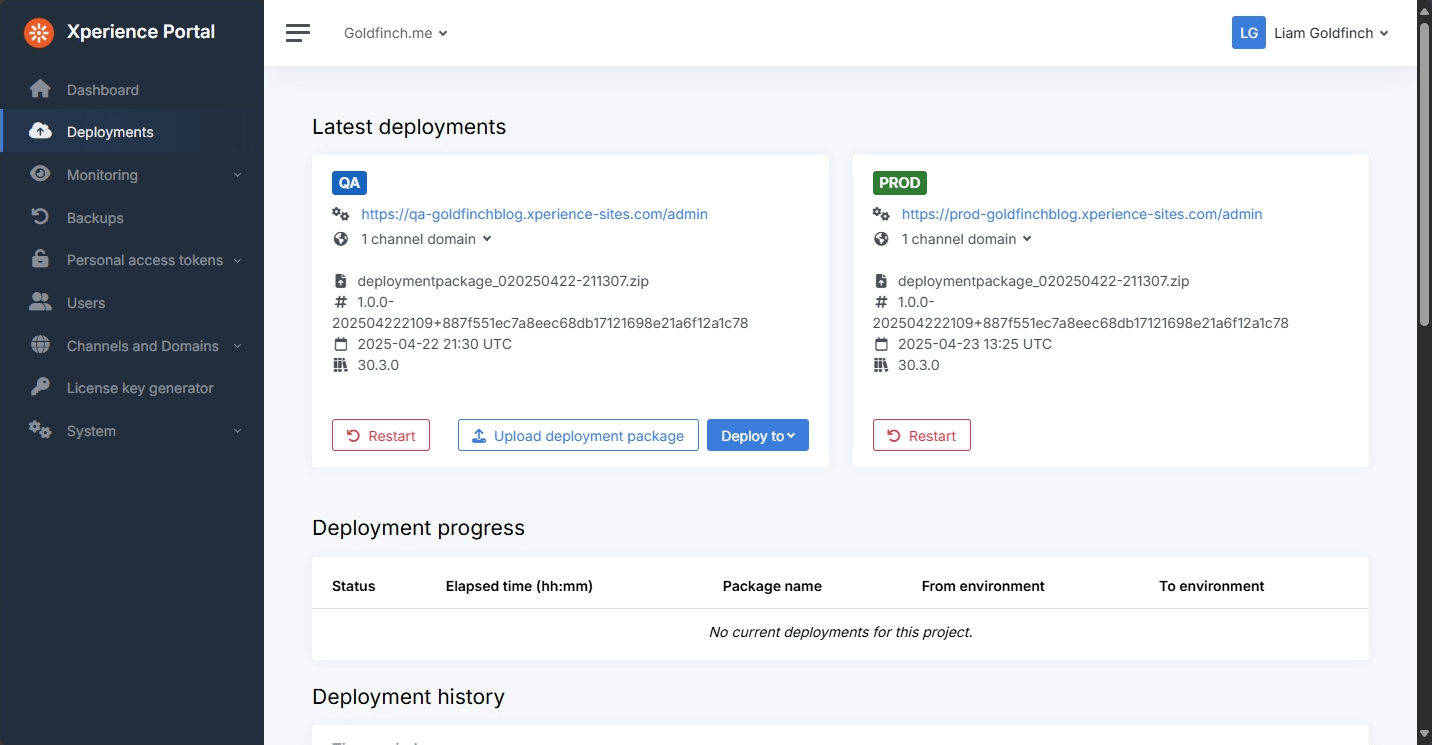
I recommend using this method once only. ⚠️
When should you use it? 🤔
This is ideal for your initial deployment, a first pass to confirm everything is wired up correctly in SaaS.
🎉 Congratulations! Your site is now deployed to the QA environment on SaaS. 👏
You can now use the Deploy to button to promote the same package to the Production environment.
Coming Next...
So far, we've proved that a trial migration of a project not originally designed to be cloud-native can be successfully migrated to Kentico SaaS.
👉 Up next, we'll walk through the changes I made for automated deployments through Azure DevOps pipelines. This is my recommended alternative to uploading the deployment package directly to the Xperience portal. 💡